If you want to kill the thermal performance of your insulation, you can take your pick of several excellent ways to do so.
The benefits of exterior continuous insulation
Build Rite LLC’s article on series and parallel heat flow in walls shows that you don’t always get the R-value on the label of the insulation you install. For example, let’s say you build a 2×6 wood-framed wall with studs spaced 16 inches on center. Then you put R-19 fiberglass batt insulation in the cavities with no other insulation. Cover it with drywall on the inside and sheathing and cladding on the exterior.
Do you have an R-19 wall? No, when you average the effect of the wood studs and add in the other materials (e.g., drywall, sheathing…), you end up with R-15.8. That’s a 17% reduction from what it says on the label. When you add in the effects of the other framing (e.g., top and bottom plates, corners, rough openings…), the net thermal resistance drops even lower.
But how does the attachment system for exterior continuous insulation work? And does it degrade the thermal performance? Let’s look at the three most popular methods.
Vertical z-girts

Vertical z-girt attachment system
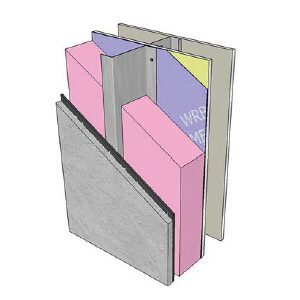
The diagram below shows the whole assembly. In both photos above, it’s a continuous piece of galvanized steel from outside to inside. That makes it a superhighway for heat transfer. So, yeah, congrats on the idea to put in exterior insulation, but they get an F on the attachment system because it kills the thermal performance.

As you’ll see below, vertical metal z-girts are the worst way to attach exterior insulation. The exterior insulation will provide only 20 to 40 percent of the thermal performance of the insulation.
Installing the z-girts horizontally gives you a bit of improvement, but it still has a thermal efficiency of only 30-50 percent. Using crossing z-girts, where you do one layer vertical and the other horizontal, is another step in the right direction, with an efficiency of 40-60 percent. Going with fiberglass or other nonmetallic materials for the girts gives you a bigger boost.
Clip-and-rail attachment
A second way to attach exterior insulation is with a clip-and-rail system. This reduces the contact at the wall because the clips don’t run the whole length of the rails. Also, the clips, rails, or both can be made of fiberglass or other nonconductive materials. Or they can be made of less conductive stainless steel.

Long screws
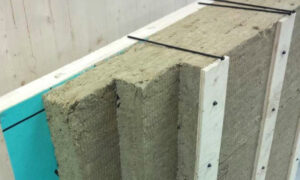
Using long screws is probably the most common way exterior insulation is attached to walls in new home construction. The screws go into wood strapping, girts, or hat channels on the outside, then all the way through the insulation, and then into the structure. The photo below shows how that system works with wood strapping and three layers of mineral wool insulation on the exterior.

Attaching exterior insulation with long screws

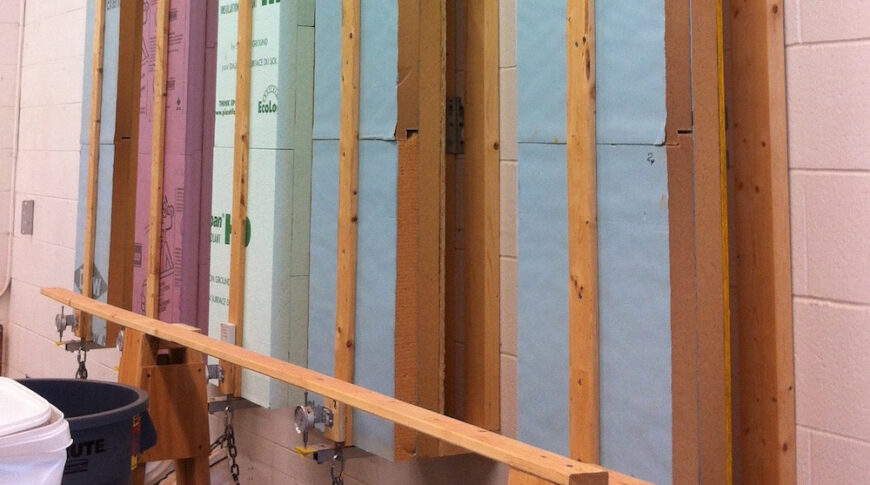
Rigid foam insulation being tested for attachment with long screws
Now, the screws aren’t free of thermal penalties. They’re made of metal and thus conductive. But there’s a lot less area for heat to conduct through with screws. And then there are two kinds of screws: galvanized steel and stainless steel. It turns out that stainless steel is great for structural use, especially where corrosion can be a problem. And they’re also great at reducing the thermal penalty because they’re not nearly as conductive as galvanized steel. Of course, the penalty with stainless steel is that it’s more expensive.
The thermal performance of various attachment systems
As you can see, galvanized steel vertical z-girts—like the ones I saw yesterday—are the worst. The two best, at greater than 90 percent thermal efficiency, are stainless steel screws and fiberglass clips with no screws. Everything else falls somewhere in between.
Thermal effectiveness of different attachment systems for exterior insulation
The takeaway here is that exterior insulation by itself isn’t going to be a game changer. You’ve got to pay close attention to the attachment system.
